

Now that you know what the SwiftChat platform can do and have been familiarised with the components it has to offer in this release, the next step in the process is building and hosting your bot on the SwiftChat platform. In this section, we have defined these processes from start to finish.
You can host a bot on SwiftChat in two ways:
We have outlined both these methods in the upcoming sub-sections. As you go through each sub-section, we have included some checklists (for information, images, documents, formats, etc.) that you will require at multiple points through the process to successfully host your bot on SwiftChat.
We have also illustrated the processes through the example of a bot that we created for SwiftChat. If you have any questions or require further support, please check the Support section below to find ways to reach us.
As we walk you through the various details of how to build a bot, we will illustrate and illuminate the process of bot creation by taking the example of the CG Video Library bot at each step.
This sub-section is for businesses which already have a bot up and running on a different platform and would like to integrate that bot with the SwiftChat platform. This process is quite seamless and does not take long.
To successfully integrate your bot with SwiftChat, you would need the following things:
This is something that would appear on the SwiftChat platform and we recommend that you have this defined beforehand.
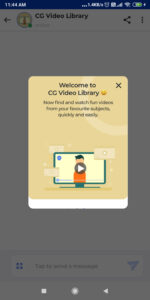
Welcome banner describing the functionality and category of CG Video Library
Every bot that is hosted on the SwiftChat platform has a logo which is also visible on the platform. A professional logo that resonates with your brand is recommended. A good logo for your bot highlights your brand as well as makes your bot a uniquely identifiable entity. You can either choose an existing logo or get a new logo designed based on the bot.
Here is an example of a logo of a bot that the SwiftChat platform hosts:

Logo of CG Video Library
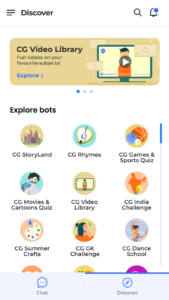
CG Video Library on the SwiftChat discover screen
If your target audience is comfortable in a language other than English, then it is a good idea to translate the conversational flow with context. The option of additional languages makes the users more comfortable while using the bot and also increases your reach.

Conversation snippet in Hindi for CG Video Library
If there are any links that you need to include in your bot for fetching any information or media into the bot, you must make sure that those links are properly working and comply with the constraints for links and media as described.
Many bots need to talk to an API to enable a service, fetch or send information or provide the functionality to the user. It needs to be ensured that the API to be used has been configured to be used by the bot.
For example, in the CG Video Library bot, links for YouTube videos have been used. We ensured that the links were working correctly and were in the proper formats as defined in the documentation.
Go through the pricing policy here.
At present, you can Sign up on the SwiftChat Platform using the Sign-Up API. When you do that, you will receive a Merchant ID.
The Merchant ID allows you to generate an API key which can be used in conjunction with the API documentation to build the bot.
We have comprehensive API documentation for using the SwiftChat platform to build and host your bot here.The API documentation covers the various functionalities SwiftChat provides to build a chatbot. When you have an API key, a developer can use the API documentation to start building the bot.
SwiftChat has a comprehensive and versatile component list that makes the conversational experience of the chatbots interactive and engaging. SwiftChat components are carefully thought of from the point of conversational UI to make the user experience smooth and easy.
SwiftChat has multiple interactive components for bots such as:
A range of new components is added regularly to the list. You can find a detailed and updated list of components for bots here: Components for Bots
If you intend to make changes or implement SwiftChat components in your bot, the developer can use the SwiftChat API documentation and the component documentation to make the necessary changes. Once the changes have been made the bot is ready to be tested.
Once the developer has finished the bot implementation it needs to be tested for functionality and performance.
SwiftChat uses AWS based testing environment. An AWS EC2 instance with T3a small instance configuration is used for testing. A developer can use this test environment as a reference and can set up their test environment accordingly. More information on the T3a instance can be found here.
Once the bot has been staged in the testing environment, the core functionality of the bot must be tested against the product and technical requirements defined before building the bot. Some of the things that are included in the functional testing are
It is important that the bot responds efficiently without any delay when the user requests information from the bot. To ensure this there are some bot performance benchmarks that the SwiftChat platform uses, they are listed below:
Summary report @ 12:06:19(+0000) 2022-05-11
Scenarios launched: 30135
Scenarios completed: 30135
Requests completed: 512295
Mean response/sec: 230.91
Response time (msec):
min: 0
max: 1363
median: 14
p95: 25
p99: 81
Scenario counts:
0: 30135 (100%)
Codes:
200: 512295
plugins.metrics-by-endpoint.response_time./api/kluster-webhook:
min: 0
max: 1363
median: 14
p95: 25
p99: 81
plugins.metrics-by-endpoint./api/kluster-webhook.codes.200: 512295
The last step in hosting a bot on the SwiftChat platform is to connect the webhook URL of the bot to the server using the Get Webhook URL API from the API documentation here.
Once you have linked your bot, you can now submit other supporting documents (if required) to get your chatbot up and running.
Your bot is now ready to go out in the world and start talking!
If you are still facing any issues in deploying your bot, feel free to contact support!
For businesses which do not already have a bot, however, they have to start by building the bot.
When you build your bot from scratch, there are some pre-requisites that you will need to fulfil before you can build and host your bot. Most of them are fairly simple but we recommend that you have them ready before your developer starts building the bot. When you have the pre-requisites finalized and ready, it will be quite simple for your developer to use our API documentation and code to build the bot on SwiftChat.
This sub-section is divided into two major parts:
Before you start building your chatbot, it is important that you define the following for the bot that you are building.
Bot type or category: This helps you as well as the users to easily categorise and find your bot. For example, the CG Video Library bot is an educational bot so its category is Education.
Bot Description: The CG Video Library bot is a bot whose function is to allow users to browse and search through videos on a certain subject, topic, or title, through a conversational flow and present relevant results to the user. The user can view the videos without ever leaving the bot conversational window. Videos are also available in multiple languages.
Bot functionality: When we know who our target audience is, we define the functionality and the services that we will provide to the users of the bot. It is important to define this as it helps us to streamline the design and development tasks for the developers. A precise definition of the functionality and services of the bot enables a robust design.
Welcome banner describing the functionality and category of CG Video Library
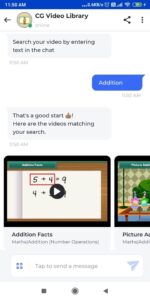
In the instance of the CG Video Library Bot, we want the users to be able to:
Search for videos by inputting a string
Browse the videos in the library

Selecting an appropriate name for your bot is an essential branding exercise. It helps users identify and connect with your bot. A bot name may be picked based on:
The name of the business and its products and offerings The business mascot (if any) The core functionality of the botFor the CG Video Library bot, we selected the name based on two ideas:

Welcome Banner with the name of CG Video Library
A good logo for your bot highlights your brand as well as makes your bot a uniquely identifiable entity. You can either choose an existing logo or get a new logo designed based on the bot.
Every bot that is hosted on the SwiftChat platform has a logo which is also visible on the platform.
For the CG Video library, we got a logo designed which highlighted the functionality of the bot.

Logo of CG Video Library

CG Video Library on the SwiftChat discover screen
This is one of the most important steps to cover before you build a bot. Designing a conversational flow means designing the conversation your bot will have with the user.
The aim of designing a conversational flow is to provide the user with an interface that allows the user to feel as if they are talking to a human to solve the problem for which the bot is designed.
This includes designing a conversation script based on the information you want from the user and the information you want to supply to the user in multiple scenarios during the operation of the bot.
The conversational flow also defines how the bot responds to certain words.
Error handling i.e. defining what happens when there is an error in the bot either due to the user input or from the bot side, is also defined here.
Handling of edge cases is also defined in the conversational flow. There are multiple instances in the conversational flow of any bot where a certain function may not make sense and might confuse the user. This disturbs the flow of conversation. To ensure that the user is pointed in the right direction, in case they encounter a confusing scenario, we need to define the behaviour of the bot for edge cases.
A good way to visualise how the conversational flow will take place is through visual diagrams and flowcharts. At SwiftChat, we use visual diagramming and storyboarding tools to simulate and present the conversational flow. It allows for clear visual presentation of ideas and ease of making changes to the conversational flow. We, at SwiftChat, have also found that a visual flow makes it easier to spot errors and edge cases. Additionally, our developers love it too!
In essence, conversational flow defines how your bot will talk to the user in various scenarios that might happen in the bot.
Having a good conversational flow ensures that the user can easily navigate through the conversation to get the desired functionality without getting confused.
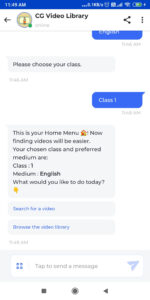
In the CG Video Library bot, we have designed the flow such that the user can continuously navigate through the bot to search or browse a video. It is also an interactive action-based flow that keeps the user engaged.
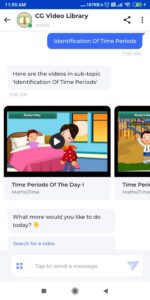
Conversation in CG Video Library showing the results to the user
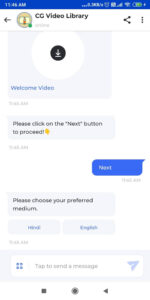
Conversation snippet in CG Video Library asking the user to select a medium
If your target audience is comfortable in a language other than English, then it is a good idea to translate the conversational flow with context. The option of additional languages makes the users more comfortable while
using the bot and also increases your reach.
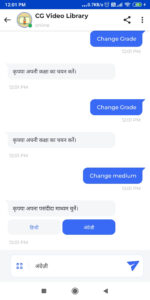
Conversation snippet in Hindi for CG Video Library
If there are any links that you need to include in your bot for fetching any information or media into the bot, you must make sure that those links are properly working and comply with the constraints for links and media as described
Many bots need to talk to an API to enable a service, fetch or send information or provide the functionality to the user. It needs to be ensured that the API to be used has been configured to be used by the bot.
For example, in the CG Video Library bot, links for YouTube videos have been used. We ensured that the links were working correctly and were in the proper formats as defined in the documentation.
ou might want the user of the bot to input certain details or information such as phone number, pin code, email id and so on. Many of these details have some constraints such as the number of digits, the presence of a special character, the type of characters etc. The details about the constraints on any information that will be input by the user which is specific to the conversational flow must be defined. This allows proper validation of the information entered by the users and prevents garbage entries in the database.
The SwiftChat platform has a clear pricing policy which will let you accurately estimate the cost of deploying and running your bot. It is recommended that you go through the pricing policy here.
At present, you can Sign up on the SwiftChat Platform using the Sign-Up API. When you do that, you will receive a Merchant ID.
The Merchant ID allows you to generate an API key which can be used in conjunction with the API documentation to build the bot.
We have comprehensive API documentation for using the SwiftChat platform to build and host your bot here.
The API documentation covers the various functionalities SwiftChat provides to build a chatbot. When you have an API key, a developer can use the API documentation to start building the bot.
SwiftChat has a comprehensive and versatile component list that makes the conversational experience of the chatbots interactive and engaging. SwiftChat components are carefully thought of from the point of conversational UI to make the user experience smooth and easy.
SwiftChat has multiple interactive components for bots such as:
A range of new components is added regularly to the list. You can find a detailed and updated list of components for bots here: Components for Bots
In the CG Video Library bot, we used the card component arranged in a horizontal carousel to display a set of videos to show the user the results of the search and browse operations. This could have been implemented by sending the video links and names one by one in the chat but it would have deteriorated the user experience. On similar lines, the user has an option to choose an option by clicking a button instead of typing the option that needs to be selected. This gives the user ease of use and makes the conversational flow smoother.
Card Component in CG Video Library
Button component in CG Video Library
After going through the API documentation and selecting the components you need to build the bot, a developer can use the associated code and methods to build a bot which can be eventually deployed in a testing environment.
Once the developer has finished the bot implementation it needs to be tested for functionality and performance.
SwiftChat uses AWS based testing environment. An AWS EC2 instance with T3a small instance configuration is used for testing. A developer can use this test environment as a reference and can set up their test environment accordingly. More information on the T3a instance can be found here.
Once the bot has been staged in the testing environment, the core functionality of the bot must be tested against the product and technical requirements defined before building the bot. Some of the things that are included in the functional testing are
1. UI of the bot
2. The message, strings and translations in the Conversational flow
3. Navigational flow in the bot
4. Other functionalities developed into the bot such as Search, Browse etc.
5. Functioning of various components that have been integrated inside the bot.
It is important that the bot responds efficiently without any delay when the user requests information from the bot. To ensure this there are some bot performance benchmarks that the SwiftChat platform uses, they are listed below:
Summary report @ 12:06:19(+0000) 2022-05-11
Scenarios launched: 30135
Scenarios completed: 30135
Requests completed: 512295
Mean response/sec: 230.91
Response time (msec):
min: 0
max: 1363
median: 14
p95: 25
p99: 81
Scenario counts:
0: 30135 (100%)
Codes:
200: 512295
plugins.metrics-by-endpoint.response_time./api/kluster-webhook:
min: 0
max: 1363
median: 14
p95: 25
p99: 81
plugins.metrics-by-endpoint./api/kluster-webhook.codes.200: 512295
The last step in hosting a bot on the SwiftChat platform is to connect the webhook URL of the bot to the server using the Get Webhook URL API from the API documentation here.
Once you have linked your bot, you can now submit other supporting documents (if required) to get your chatbot up and running.
Your bot is now ready to go out in the world and start talking!
If you are still facing any issues in deploying your bot, feel free to contact support!